color zones
Technical information
- description
- selectively shift hues, chroma and lightness of pixels.
- purpose
- creative.
- input
- linear or non-linear, Lab, display-referred.
- processing
- non-linear, Lab.
- output
- non-linear, Lab, display-referred.
Selectively adjust the lightness, chroma and hue of pixels based on their current lightness, chroma and hue.
This module works in CIE LCh color space, which separates pixels into lightness, chroma and hue components. It allows you to manipulate the lightness, chroma and hue of targeted groups of pixels through the use of curves.
You first need to choose whether you wish to adjust (select) pixels based on their lightness, chroma or hue. You can then use three curves, on their respective tabs, to adjust the lightness, chroma and hue of ranges of pixels selected via this method.
Note: This module should be used with care, as transitions between colors may not be graceful. Instead, use the color balance rgb module with a parametric mask.
🔗pixel selection method
The color zones module offers three different methods for selecting which pixels you want to adjust. They are:
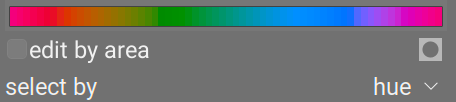
- select by hue (default)
- Select pixels to manipulate based on their hue. For example, you may want to darken a blue sky, or to change a red porche into a yellow one. The following image shows the full range of hues that you can choose to operate on:
-
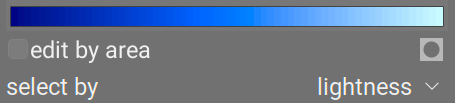
- select by lightness
- Select pixels to manipulate based on their lightness. For example, you may want to make your shadows brighter, or to make your highlights more yellow. The following image shows the range of lightness levels that you can choose to operate on, from dark to light:
-
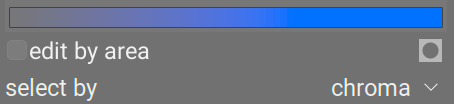
- select by chroma
- Select pixels to manipulate based on their chroma. For example, you may want to tone down the chroma of some already highly saturated pixels, or to change their hue. The following image shows the range of chroma levels that you can choose to operate on, from a completely unsaturated monochrome gray through to the most highly saturated color:
-
🔗pixel manipulation curves
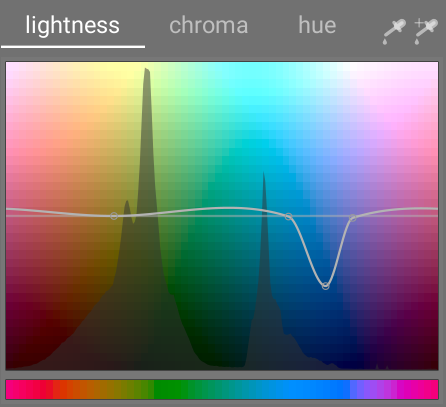
Once you have chosen a pixel selection method, the selected range of lightness, chroma or hue levels will appear along the horizontal axis of the three pixel manipulation curves, which can be viewed and adjusted by choosing the appropriate tab (lightness, chroma, hue).
If, for example, you were to choose to select by hue (the default), the horizontal axis (below the manipulation curves) would show the range of hues you can work with, and the three pixel manipulation curves would appears as follows:
- lightness
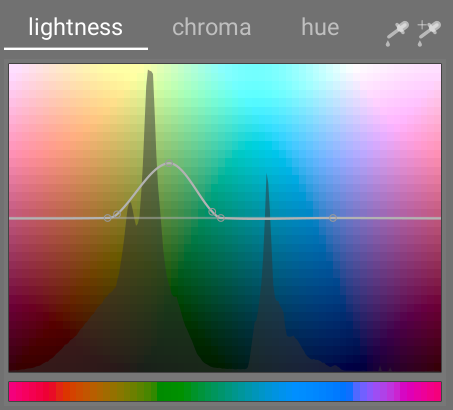
- By adjusting the lightness curve up or down in a given (hue) location, you can brighten or darken pixels matching hues where the curve has been raised or lowered, respectively. The example below reduces the lightness of the blue parts of the image:
-
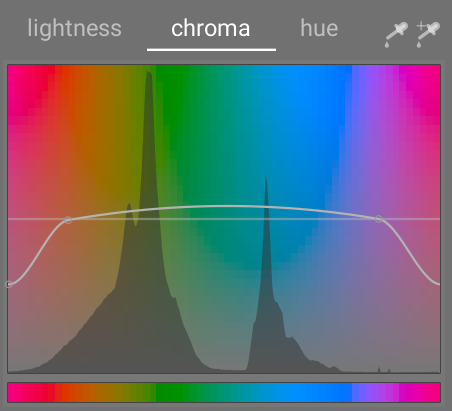
- chroma
- By adjusting the chroma curve up or down in a given (hue) location, you can desaturate (make less colorful) or resaturate (make more colorful) pixels matching hues where the curve has been raised or lowered, respectively. The example below reduces the chroma of the red parts of the image:
-
- hue
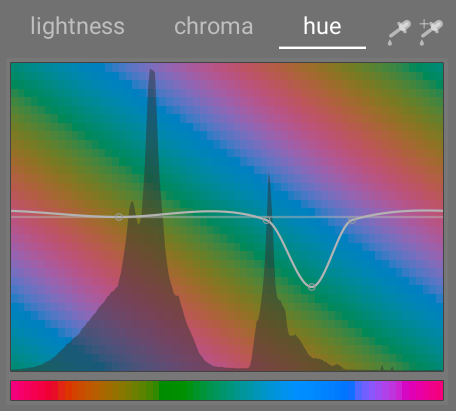
- By adjusting the hue curve up or down in a given (hue) location, you can shift the hue of pixels matching hues where the curve has been raised or lowered, allowing you to replace one color with another. The example below shifts the blue parts of the image to green:
-
The curves work similarly in the lightness- and chroma-based selection modes as well. See the section on curves to see how spline curves work in general.
Note that these examples are somewhat contrived in order to illustrate the module’s usage. In practical use, they would likely need to be combined with drawn and/or parametric masks to further isolate their effect.
🔗range selection
When adjusting the pixel manipulation curves, it can sometimes be difficult to judge exactly where on the horizontal axis pixels will fall. To the right of the tab controls are a pair of pickers that can be used to assist with this.
If you click the left-hand picker and choose a pixel in the image, you will see a dark vertical line showing where that pixel falls on the horizontal axis. If you Ctrl+click or right-click on the same picker you can choose a rectangular area from the image – the range of values represented within the selected rectangle will be shaded vertically, with a similar dark line showing the median value.
If you click on the right-hand picker, you can similarly choose a rectangular area on the image and the display will be shown as described above (a shaded area with a dark vertical line). However, in this case the picker will also automatically add some control points to the curve for you, representing the highlighted range (see below). Simply drag on the center node to raise or lower the curve within the selected range. Alternatively, hold Ctrl while selecting a range to automatically create a positive curve (push up the selected range) or hold Shift while selecting to create a negative curve (pushed down).
🔗module controls
The following controls are available in the color zones module:
- lightness, chroma & hue tabs
- Each tab displays a pixel manipulation curve to allow you to alter “lightness”, “chroma”, or “hue” based on the pixel selection method.
- edit by area
- Choose how to interact with the curve. This setting is disabled by default, allowing the control points for the curve to be freely placed. Check the box to fall back to the legacy “edit by area” mode, which functions in a similar way to the spline curve controls used in wavelet modules.
-
 mask display
 - Enable the mask display to highlight pixels that have been affected by color zones adjustments in yellow.
- select by
- Define the horizontal axis (the range of values to work on). You can choose between “lightness”, “chroma”, and “hue” (the default). Changing this parameter resets all pixel manipulation curves to their default state (horizontal straight lines). If you want to work on multiple ranges, you need to create additional instances of the module.
- process mode
- Choose between a “smooth” (default) or “strong” processing mode. The default mode is less likely to cause artifacts.
- mix
- Use this parameter to tune the strength of the overall effect.
- interpolation method
- Define how the curve is interpolated using the user-defined control points. See the curves section for more details.