tagging
Manage tags attached to images.
Tags provide a means of adding information to images using a keyword dictionary. You can also manage tags as a hierarchical tree, which can be useful when their number becomes large.
Tags are physically stored in XMP sidecar files as well as in darktable’s library database and can be included in exported images.
🔗definitions
The following definitions assume that you have set up a single tag named “places|France|Nord|Lille”.
- tag
- A tag is a descriptive string that may be attached to an image. A tag can be a single term or a sequence of connected terms forming a path, separated by the pipe symbol. For example, “
places|France|Nord|Lille” defines a single tag, where each term in the path forms a smaller subset of those before it. You can attach as many tags to an image as you like. -
You can assign properties (name, private, category, synonyms and image order) to a tag.
-
You can use tag names to define collections that are displayed, processed, and exported in a durable custom sort order, which does not change when other collections (containing some of the same images) are reordered.
- node
- Any path that forms part of a tag is a node. In the above example, “
places”, “places|France”, “places|France|Nord” and “places|France|Nord|Lille” are all nodes. In the hierarchical tree view, the nodes form the branches and leaves of the tree. - free node
- Any node that is not explicitly defined as a tag is called a free node. In the above example, “
places”, “places|France” and “places|France|Nord” are all free nodes. You cannot set any properties, except “name”, for a free node and you cannot add a free node to an image. See the “multiple tags” section below for more information. - category
- Any tag can be flagged by the user as being a “category”.
🔗multiple tags
The above definitions considered a simple example – a single tag and its properties. Consider instead the scenario where the following four pipe-delimited tags are each separately defined in darktable.
places|France|Nord|Lille
places|France|Nord
places|France
places|England|London
In this case the nodes are
places
places|France
places|France|Nord
places|France|Nord|Lille
places|England
places|England|London
The only free nodes are “places” and “places|England”. Both of these free nodes are also (by implication) categories.
You can attach any of these tags to any image. Any tags attached to an image, except category tags, can be included when that image is exported.
If you attach the “places|France|Nord|Lille” tag to an image, the “places|France|Nord” and “places|France” tags are also implicitly attached to that image (you don’t need to attach them manually). Note that this is only true here because those additional tags have been separately defined – the “places” node is not included because it is a “free node” (not a tag).
🔗module sections
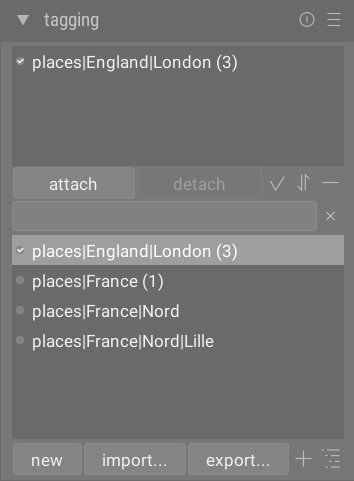
The tagging module consists of two sections
-
The upper attached tags section (with the attach/detach buttons under it)
-
The lower tag dictionary section (with the new/import…/export… buttons under it)
🔗attached tags section
The attached tags section displays tag(s) attached to image(s), where those images are
-
under your mouse cursor (if hovering over an image in the lighttable view); or
-
currently selected (if not hovering over an image)
Automatically generated darktable tags (with names starting “darktable|”) cannot be selected.
At the bottom of the attached tags section are the following buttons, from left to right:
- attach
- If a tag is selected in the tag dictionary section, attach this tag to the selected images.
- detach
- If a tag is selected in the attached tags list, detach that tag from the selected images. A tag can also be detached if you right click on the tag name and select detach from the pop-up menu.
-
 hidden tags
 - Choose whether to view any hidden tags that darktable has automatically attached to the selected images.
-
 sort
sort - Choose whether to sort the attached tags list alphabetically or by the count shown in brackets next to the tag (this count indicates how many of the selected images have that tag attached to them).
-
 parents
 - Choose whether or not to show the parent categories of the tag.
You can adjust the height of the attached tags window by holding Ctrl and scrolling with your mouse wheel.
🔗tag dictionary section
The tag dictionary section displays all of the tags that are available in darktable’s database. At the top of the tag dictionary section is a text box where tag names can be entered. Below this is a list of available tags, which may also include indicator symbols to the left of the tag names. The meanings of these symbols are as follows:
-
a check mark [✓] indicates that the tag is attached to all of the selected images
-
a minus sign [–] indicates that the tag is attached to at least one of the selected images. If the symbol is next to a node name in the hierarchical tree view, it means that one of the child tags under that node is attached to at least one of the selected images.
-
if no indicator symbol is present, this means that the tag is not attached to any of the selected images, or that the node has no child tags attached to any of the selected images.
In the hierarchical tree view, a name in italics represents either a free node or a category.
Below the tag dictionary list are the following buttons, from left to right:
- new
- Create a new tag, using the name that has been entered into the text entry box at the top of the tag dictionary section.
- import…
- Import tags from a Lightroom keyword file.
- export…
- Export all tags to a Lightroom keyword file.
-
 suggestions
 - Show a list of suggested keywords based on the keywords already associated with the selected images (see the preferences section). CAUTION: This view queries the database so might be slow.
-
 list/tree
 - Toggle the display of tags between the straight list view and hierarchical tree view.
You can adjust the height of the tag dictionary window by holding Ctrl while scrolling with your mouse wheel.
🔗usage
The following sections describe the operations that can be performed with tags.
🔗text entry
The text entry box (shown under the attach/detach buttons) has multiple purposes.
-
If the tag dictionary list is in list view mode (rather than tree view mode), then typing the first few characters of a tag will bring up a list of suggestions. You can then scroll down with the arrow keys and press Enter to select one of the suggestions. Pressing Enter a second time will attach it to the selected images. You can also edit the name of the tag before pressing Enter – in this case the tag will be created if it doesn’t already exist in the database.
-
Typing some partial text into the text entry box allows you filters the set of tags shown in the tag dictionary window to those whose name or synonym matches the entered text. Press Enter to attach a tag with the entered name to the selected images. If that tag name does not yet exist in the database, it will be created before being attached.
-
The pop-up menu entry “copy to entry” can be used to copy a selected tag to the text entry box. You can then edit this name and press Enter to create a new tag with that name, making it easy to create multiple tags with similar names.
🔗create tag
There are several ways to create a new tag:
-
Import a text file. You can import one or more text files in the Lightroom tagging file format. You can also export your tags, edit the exported file, then re-import it. The import function updates existing tags and creates new tags as required. If you change the name of a tag in an imported file, it will be treated as a new tag.
-
Import already-tagged images. This method does not offer any flexibility to change tag names or categories during the import process.
-
Use the “create tag” sub-menu. A tag can be created manually, under an existing one (hierarchical) or at the root level.
-
Use the “set as a tag“ sub-menu. You can set a free node (e.g. ”
places|England”) as a tag so that it gets implicitly attached to all images tagged with its sub-tags (e.g. ”places|England|London”). -
Type into the text box and press the “new” button or the Enter key. Hierarchical tags are created using the pipe symbol “
|” to separate nodes. Note that the entered tag is also attached to any selected images.
A number of tags are automatically generated by darktable when certain actions are undertaken. For example, the tags “darktable|exported” and “darktable|styles|your_style” can be used to identify images that have been exported and had styles applied, respectively.
🔗edit/rename tag
The tag dictionary can be maintained via the “edit…” and “change path…” items in the right-click pop-up menu.
The “edit…” operation allows you to change the name of a tag, though you cannot change which node it belongs to (you cannot use the pipe “|” symbol in the tag name field). The command is aborted if you try to enter a tag name that already exists. You can set the private and category flags and define synonyms for the tag (see below). These attributes are recorded in the XMP-dc Subject and XMP-lr Hierarchical Subject metadata entries, respectively. You can control which tags are included in exports by changing settings in the export module.
-
A tag set as “private” is, by default, not exported.
-
A tag set as “category” is not exported in
XMP-dc Subject. However it is exported inXMP-lr Hierarchical Subjectas this XMP metadata holds the organization of your tags. -
“synonyms” enrich the tag information and are mainly used to assist search engines. For example “juvenile”, “kid” or “youth” can be set as synonyms of “child”. Synonyms can also be used to translate tag names to other languages.
The “change path…” operation is only available in the tree view mode, and it shows the number of tagged images which would be impacted by a change to the name of this node. The change path window lets the user change the full path of the node, including the nodes to which it belongs (nodes can be specified using the pipe “|” symbol). This operation is powerful, but please take care as it can have a significant impact on the metadata of your images. The operation is aborted if the requested change causes a conflict with an existing tag.
A quick way to organize the tag structure is to drag and drop the nodes. In the tree view mode, you can drag any node and drop it on top of any other node. The first node and its descendants, if any, become descendants of the second node. Dragging over a node automatically opens that node (to avoid opening a node, drag over the node selection indicator instead). To place a node at the root level, drag it onto the top of the tagging window. If the requested change causes a conflict with an existing tag, the operation is aborted.
🔗attach tag
There are a number of ways to attach an existing tag to a group of selected images:
- click on a tag in the tag dictionary window to select it, then click on the attach button.
- right-click on a tag in the tag dictionary window, to show a pop-up menu, then select the “attach tag” menu item.
- double-click on a tag in the tag dictionary window.
- right-click on a tag shown in the attached tags view to show a pop-up menu. If some of the selected images do not currently have that tag, the “attach tag to all” menu item can be used to attach that tag to all the selected images.
- Type into the text box and press the “new” button or the Enter key. This will create the tag if it doesn’t already exist, and attach it to the selected images.
- Press Ctrl+T to open a small text box at the bottom of the central view of the lighttable. Type in the name of a tag and press Enter. The tag will be created if it doesn’t exist, and attached to all the selected images.
- Drag an image or group of images and drop it onto the desired tag.
When hovering over the images in the lighttable you can check which tags are attached to the image, either by looking at the attached tags window in the tagging module, or in the tags attribute in the image information module.
🔗detach tag
There are several ways to remove a tag from a group of selected images:
- click on a tag in the attached tag window of the tagging module to select the tag, then click on the detach button.
- double-click on a tag in the attached tag window.
- right-click on a tag in the attached tag window, to show a pop-up menu, and select “detach”.
🔗delete tag
It is possible to completely remove a tag from all images (whether selected or not) and delete the tag from the database. Because this could impact a large number of images, a warning will be displayed indicating how many images currently have this tag attached. Take this warning seriously as there is no way to undo this action (except by restoring your database and/or XMP sidecar files from a backup). A tag in tag dictionary window can be deleted in the following ways:
- right-click on a tag in the tag dictionary window, to show a pop-up menu, and choose “delete tag”.
- right-click on a branch node in the tag dictionary window, to show a pop-up menu, and choose “delete node” to delete the selected node together with any child nodes.
🔗import / export
The “import” button allows you to choose a text file (which must comply with the Lightroom tag text file format) and import its content. If a tag in the imported file already exists, its properties will be updated, otherwise a new tag will be created.
The “export” button exports your entire tag dictionary into a text file of your choice (Lightroom tag text file format).
🔗copy tag to clipboard
It is possible to copy a single selected tag to the clipboard from both attached tags and tag dictionary sections by using the pop-up menu entry “copy to clipboard”.
🔗find tag
If you right-click on a tag name in the attached tags section and click find tag, then the tag dictionary will show all matching tags.
🔗keyboard
The following keys can be used within the tagging module:
-
The Tab key can be used to navigate between the attached tags view, the text entry box, and the tag dictionary view. Pressing Tab from within the text entry field selects the first matching tag in the tag dictionary view (if any).
-
The Down arrow key is equivalent to the Tab key, when pressed while inside the text entry field.
-
Shift+Tab does the same as the Tab key but navigates in the opposite direction. Pressing Shift+Tab from within the text entry field selects the first user tag in the attached tags view (if any).
-
The Enter key can be used within the tag dictionary view to attach the selected tag, keeping focus on the attached tag (similar to when a tag is attached using the mouse).
-
Pressing Shift+Enter from within the tag dictionary view returns focus to the text entry field.
-
The Delete / BackSpace keys can be used within the attached tags view to detach the selected tag.
🔗navigation
To see the images bearing a particular tag in the tag dictionary window, right-click on the tag name and choose “go to tag collection” in the resulting pop-up menu. This opens a collection in the collections module showing all images containing this tag. You can also select other tags in the collections module by double-clicking on the collection for the other tag.
To return to the collection that was selected before opening a tag collection select the “go back to work” item from the pop-up menu. This will allow you to return to the original collection, as long as you haven’t selected any other collections in the meantime.
🔗preferences
The “preferences…” option in the presets menu brings up a dialog where you can tweak the behavior of the tag suggestions list. The tag suggestions list comprises two parts, with the best-matched tags on one side and the most-recently-attached tags on the other. The following options are available:
- suggested tags level of confidence
- Level of confidence used to include the tag in the suggestions list (default 50):
- 0: display all associated tags,
- 99: match tags with a 99% confidence level,
- 100: this is essentially an unreachable level of confidence and so returns no matching tags. Use 100% to disable the best-matched tag suggestion list (faster).
- number of recently attached tags
- Number of recently attached tags to include in the suggestions list (default 20). A value of “-1” can be used to disable the most-recently-attached suggestions list.