(deprecated) crop and rotate
Technical information
- description
- change the framing and correct the perspective.
- purpose
- corrective or creative.
- input
- linear, RGB, scene-referred.
- processing
- geometric, RGB.
- output
- linear, RGB, scene-referred.
Please note that this module is deprecated from darktable 3.8 and should no longer be used for new edits. Please use the crop module to crop the image, the rotate and perspective module to perform rotation and keystone correction, and the orientation module to flip the image on the horizontal/vertical axes.
Crop, rotate, and correct perspective distortions using on-screen guides.
Whenever the user interface of this module is in focus, the full uncropped image will be shown, overlaid with crop handles and optional guiding lines.
Resize the crop by dragging the border and corner handles.
Move the crop rectangle by clicking and dragging inside the crop area. Constrain movement to the horizontal/vertical axis by holding Ctrl/Shift, respectively while dragging. Commit changes by giving focus to another module.
If you intend to use the retouch module, you are recommended to use rotate and perspective for rotation and/or keystone correction only, performing creative cropping in the crop module. This process ensures that the entire image is available for source spots in retouch, since the crop module is placed after retouch in the pixelpipe.
Note: Some of the tools in this module (angle adjustment and perspective distortion correction) require the original image data to be interpolated. For best sharpness results set “lanczos3” as the pixel interpolator in preferences > processing.
🔗module controls
The crop and rotate module controls are split between two tabs as follows:
🔗main tab
- flip
- Flip the image on the horizontal, vertical or both axes.
- angle
- Correct the rotation angle to level an image by setting a numerical value in degrees or using the mouse. To use the mouse, right-click and drag to draw a line along a suitable horizontal or vertical feature. As soon as you release the mouse button the image is rotated so that the line you drew matches the horizontal or vertical axis.
- keystone
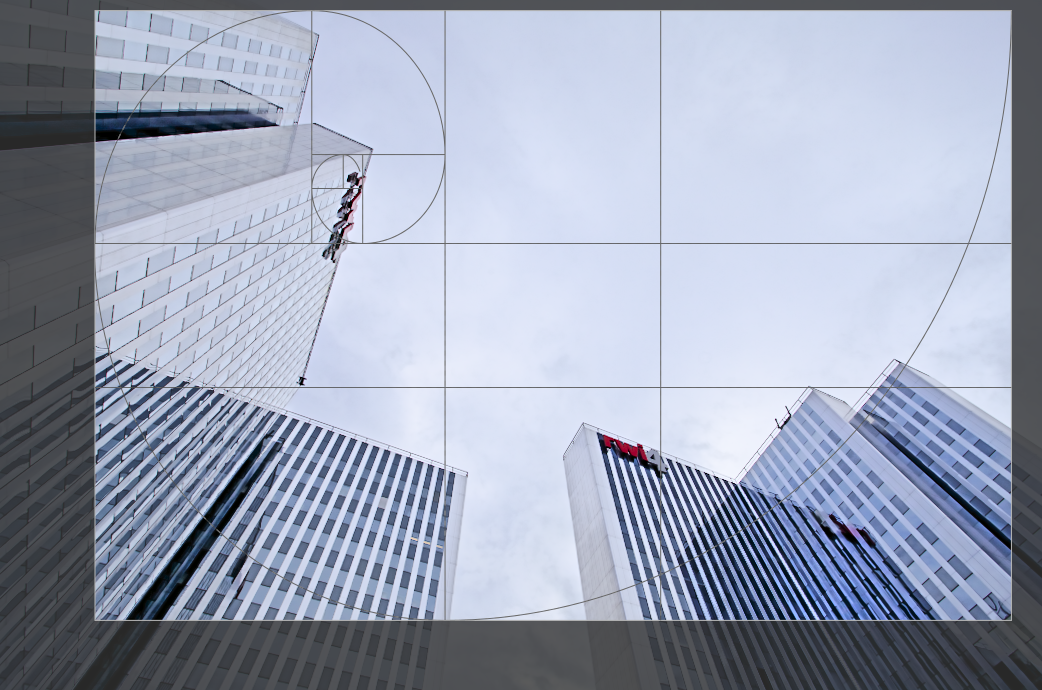
- Correct perspective distortions. This tool is useful, for example, when you shoot a high building from the ground with a short focal length, aiming upwards with your camera. The combobox allows you to select the type of correction you want to use:
- vertical: Limit the correction to vertical lines
- horizontal: Limit the correction to horizontal lines
- full: Correct horizontal and vertical lines at the same time
-
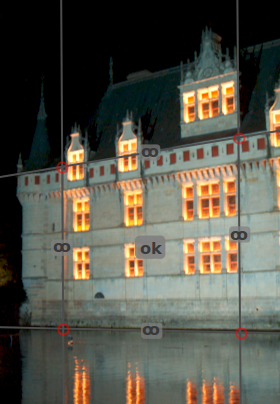
Depending on the selected correction type you will see two or four straight adjustment lines overlaid on your image. Two red circles on each line allow you to modify the line positions with your mouse. Each line additionally carries a “symmetry” button. If activated (and highlighted in red) all movements of the affected line will be mirrored by the opposite line.
-
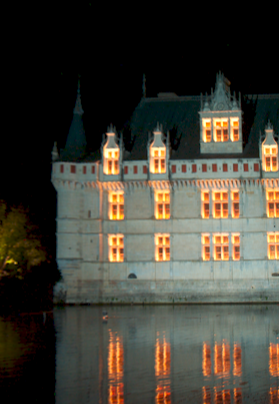
In order to correct perspective distortions, you need to find suitable horizontal and/or vertical features in your image and align the adjustment lines with them. When finished, press the “OK” button located close to the center of the image – corrections will be applied immediately. You can return to the module and refine your corrections by selecting “correction applied” in the keystone combobox.
- automatic cropping
- Automatically crop the image to avoid black edges on the image borders. This is useful when rotating the image.
- aspect
- Set the aspect ratio of the crop, constraining the width:height ratio of the crop rectangle to the chosen aspect. Many common numerical ratios are pre-defined. A few special aspect ratios deserve explanation:
- freehand: Crop without any restrictions
- original image: Retain the aspect ratio of the original image
- square: Constrains the aspect ratio to be 1:1
- golden cut: The golden ratio (1.62:1)
-
You can also enter any other ratio after opening the combobox by typing it in the form of “x:y” or as a decimal (e.g. “0.5” to apply a ratio of 2:1).
-
If you want to add an aspect ratio to the pre-defined drop-down list you can do this by including a line of the form “
plugins/darkroom/clipping/extra_aspect_ratios/foo=x:y” in darktable’s configuration filedarktablercin the configuration directory. Here “foo” defines the name of the new aspect ratio and “x” and “y” the corresponding numerical values (xandymust be integers). Note that you can only add new entries for ratios not already present in the drop-down list. -
Finally, the button beside the aspect combobox allows you to switch between portrait and landscape orientation if you have selected a rectangular aspect ratio.
Note: When resizing an image in freehand mode you may retain the currently-set aspect ratio by holding Shift while dragging on any of the resize controls.
- show guides
- Tick the box to show guide overlays whenever the module is activated. Click the icon on the right to control the properties of the guides. See guides & overlays for details.
🔗margins tab
These sliders allow you to directly set how much of the image to crop from each side. They are automatically updated if you move or resize the crop area on the image using the mouse.
- left
- The percentage of the image that should be cropped from the left side.
- right
- The percentage of the image that should be cropped from the right side.
- top
- The percentage of the image that should be cropped from the top.
- bottom
- The percentage of the image that should be cropped from the bottom.